Monday, October 26, 2009

Little Dino

Last year after Halloween, I had picked up this cute Mickey Mouse costume at the Disney Store on clearance in a size 9-12 months. I was proud of myself for thinking ahead and thought it would be great for my little Abe. As Halloween was approaching Dan and I got to talking and we both agreed that the Mickey Mouse costume was just not fitting for the little guy. It shouldn't really matter, but nonetheless I decided a dinosaur costume would be more appropriate for him. The pattern I used was Simplicity Costumes for kids 0607. Here is the end result, just in time for Halloween.
The fabric is some old vintage upholstery fabric that my mom had picked up for me. I could not have found fabric that could have been more appropriate for this costume. The only issues I had with this fabric was that it was very thick and not the easiest to sew. The hardest areas were the hat and tail where the fins were added. I actually broke 3 denim needles!

Here is a shot of the hat. Not his favorite to wear, but he does leave it on.
Here is the tail. We'll have to see how this works with the stroller :0.

The little guy in action. When I'm carrying him in the costume it kind of feels like I'm packing a small rug. It's pretty hilarious, but I have to say the fabric was heavy duty enough that I'm pretty sure he won't need a coat on Halloween.


Wednesday, October 21, 2009

Oven Mitt

My friend Brooke's birthday was approaching and what else would I make for such an amazing cook. I have made this mitt once before, but this one was my favorite. At least one of the fabrics is Amy Butler but I'm not sure about the others. I just love all of Amy Butlers materials. They are all so colorful and have the most beautiful print. I got this idea and pattern from Denyse Schmidt "Quilts". It is a fabulous book which I highly recommend. This is the first project I've made since last year which is painful to say since I LOVE to sew so much! Hopefully I will have more to post soon.

Monday, October 19, 2009

Wee Bunny


I've now made four of these cute little bunnies. This last one was for my little niece that just turned 2! It is an easy pattern and my girls just love it. I found the pattern as a free download here. The only addition that I made was to put a name on the front of the bunny. Now, I wish I had a machine that embroiders but I don't, so I just printed the name on regular paper in reverse (the size and font I liked) and pinned it to the back of the fabric. I then used my open toe applique foot and a small zigzag stitch to sew the name. I also made a small circle bean bag (or rice bag) that I placed in the bottom of the bunny so it will sit up better. The ears do end up being flimsy. I've tried adding interfacing, but didn't find that it helps that much. Next time on the ears I will try fusible fleece. We'll see.....

Monday, October 12, 2009

ABC's


I made these for my cute little niece who just turned 2. I saw the idea online on this blog:


and thought it was a great way to use up my microsuede swatch book we picked up at the furniture store closeout. The letters are so soft and the batting in between makes them a little poofy. The edges are finished like a rag quilt, clip the unfinished edges and they fray after you wash/dry. Let me tell you...a lot of tracing, cutting, clipping, etc! But it was a fun project. It took me about 4-5 hours total throughout the week. (You can probably see that the microsuede on the front didn't fray, but the little clipped fringe adds a cute look).

Sunday, October 11, 2009

Halloween pillowcases


I wanted to make my kids something quick and easy for Halloween- end result pillowcases. I got the fabric around Thanksgiving last year at Joann fabrics (planning ahead I guess) . The fabric is all Debbie mum, and I believe I got it something like 80% off? Anyway it was a steal and that's why I stored it for a whole year :). I found an excellent tutorial here. I think they took me a total of 2 hrs total and I'm typically very slow.
My kids were excited and loved the fabric.
I made one for each kiddo- even though it will be a couple years before Abe will use it.

Tuesday, October 6, 2009

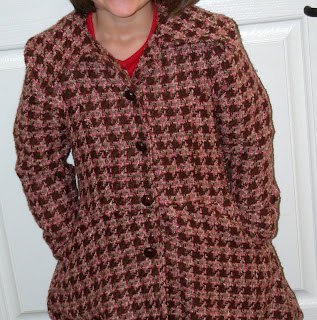
Girl's dress coat

So a few weeks ago after I got my serger back from the repair center I was itching to do some sewing/serging, so I picked this project.
I used Burda pattern number 9596 and this was coat B. Since this was my first coat attempt I was nervous to use fabric that was pricey, so I picked this fabric up at a garage sale for $1. I really thought it was super cute, but it was not easy to work with. It frayed very easily, was difficult to line up the nap, and it had some to stretch to it. I'm not even sure what this material is called! However I did think the end result turned out nice.
I lined the coat with a pink flannel that I had picked up at Joann fabrics for $1.50 yd, and it took 1 5/8 yd of this fabric. I thought it would give the coat a little extra warmth, and I bought the "made by" tag from Joann's. I thought it was a nice touch.
I really wanted to do pink buttons, however I was unable to locate any that would work for this coat. My mom found these buttons in her stash, and I liked the way they looked. After working on this fabric I opted to not sew buttonholes- I kind of thought they'd look a mess, so the buttons are ornamental and I used large snaps to keep the coat closed.
Here is the fit on Miss Savvy. She is so excited about it and loved that it had pockets. I liked that it cost me less than $5. Coming soon...... a coordinating scarf.

Thursday, October 1, 2009

the frames

today paige and I made frames.


First we started with a wood frame.


Then we painted the frame.


Then we glued the buttons.


we are done! wow wow wubzy


pink ones (paiges)
blue ones(savvys)