Well this Christmas I was in such a hurry to get everything finished and wrapped, that I forgot to take pictures of some of the gifts I made! Here are a few things that I made from the book "Easy does it for Christmas" by Nancy Halvorsen. It is from the Art to Heart collection. Any of her books have super cute ideas.
The first picture is of some applique hot pads. I used the angel and snowman template for these. I did another applique of Santa onto a pillow for my sister, but forgot to take a picture.
About 2 years ago I had made Holly placemats, and not had time to do the napkins and rings. So this year I made these holly napkin rings (and coordinating napkins) and gave them to go along with the placemats.
Tuesday, December 29, 2009
Monday, December 21, 2009
A cute snowman
A lady from my church dropped these cute little snowmen of at my home for my girls. I thought they were darling and have decided to duplicate them and share them with you. If I find out where she got her idea I will come back and link it for you.
To start with for each snowman you need:
-1 pack starburst
-paper cut 3.5 x 6.5
-red felt cut 2 x 4
-small googly eyes
-orange foam sheet (or felt)
-ribbon
-small pompoms
-string (or yarn)
-hot glue gun
First take your white paper and wrap the Starburst like a present.
Then hot glue your red felt around the top.
Tie a string (or yarn) around the felt to make it look more like a hat.
Time to glue your small googly eyes and carrot nose (from felt or foam). Just use a black marker to make the dots for the mouth.
Then just tie a ribbon in a knot around the neck and hot glue 3 small pom poms down the front for buttons. Then you're done! We made a bunch today to give to cousins :)
Sunday, December 20, 2009
Just in time
Well it took me long enough, but I did finish my girls' dresses and my little guy vest outfit just barely in time for Christmas. They wore all their coordinating outfits to church today and they all looked great! It was definitely worth all the early mornings.
For the girls' dresses I used Project Runway Simplicity pattern number 2767. The only modification I made was lengthening it and adding the fabric trim to the bottom. I used fabric from Joann's Casa collection. For the body of the dress I used and amethyst crepe fabric and then added the chifon (with the sparkly ducs) to the top, sleeves, and skirt. I loved the 3 roses on the waist. The 3 girls looked really cute in them.
For my little guy I made a vest, pants, & tie. For the vest and pants, I used fabric from the suitings section of Joann Fabrics and used Burda pattern 9732. The only change I made was to the cuff. For this outfit I just did a simple hemmed cuff. I lined the vest in purple to coordinate with the girls' dresses. For the tie, I used the same crepe fabric as for the girls' dresses and then I followed this tutorial. I had my husband tie it, then I cut the neck area off and hand sewed the upper edges so it wouldn't fall apart, and then added the elastic to go around the neck. It turned out pretty good.
Saturday, November 14, 2009
A Pocket Bookmark
I whipped up these bookmarks for my RS Book Group. Since we decide the year's books in one meeting I thought this would be a fun way to keep track of what we chose. Since I did these last month, my memory of measurements might be a little off. The purple paper was approx. 10.5"x2.5". I eyeballed the strip into thirds and folded up the bottom portion. I used a small hole punch to go through both layers and each side, threaded a ribbon through to keep the flap secure, and then tied a bow. Then I typed up the calendar with the date, book selection and author, and the host. I used a Word document and created columns that (again I eyeballed and came out lucky!) fit into the little pocket bookmark. I realized that these could even be reused and simply put in new calendars every year!
PS - the font I used for the title is a free font from dafont.com called "Jane Austen". I thought it was an appropriate detail :)
Friday, November 13, 2009
Applique bag for rag quilt letters
Well I finished my rag quilt letters and I decided in an attempt to keep them all together I'd better get some type of bag to keep them in. And this is what I came up with.
The bag was one I pulled out of my laundry room (one of 3- I figured we could manage without it). It is a nice mesh bag and bonus- already has a zipper.
To customize the bag I ripped the side seams and added the fabric swatch with the applique "L is for Lydia". I used the block letters from my lettering software called "Creative Keepsakes". It also had the little face image and I gave her a bow. For the wording "is for" I printed it in reverse, taped it to the back of the fabric, and sewed it using a very thin width and narrow zigzag stitch (almost the button hole width).
I then made a pink fleece pom pom zipper pull secured with embroidery floss to add a little fun.
A quick easy (see through) bag to keep all those letters contained.
The bag was one I pulled out of my laundry room (one of 3- I figured we could manage without it). It is a nice mesh bag and bonus- already has a zipper.
To customize the bag I ripped the side seams and added the fabric swatch with the applique "L is for Lydia". I used the block letters from my lettering software called "Creative Keepsakes". It also had the little face image and I gave her a bow. For the wording "is for" I printed it in reverse, taped it to the back of the fabric, and sewed it using a very thin width and narrow zigzag stitch (almost the button hole width).
I then made a pink fleece pom pom zipper pull secured with embroidery floss to add a little fun.
A quick easy (see through) bag to keep all those letters contained.
Tuesday, November 10, 2009
Fleece hat and Spiral scarf
Since winter will soon be here I went ahead and made some fleece hats and spiral scarves for my girls. This is what I came up with.
I just patterned the hat after a beanie type fleece hat we had at the house. Then for the flower I used the pattern here. I just enlarged it and secured it with a large button.
For the spiral scarf I followed this tutorial.
Then instead of decorating it with yarn I added three flowers to each end. For the flowers I used a faux suede material and secured them with different size and colors of pink buttons.
This is the final look. I think Savvy looks very chic. Now onto Christmas dresses- with a few distractions along the way :)
Wednesday, November 4, 2009
Peanut- the "wee" elephant
I'm sure you're thinking didn't you just do a "wee" stuffed animal, and the answer is yes. But they are from 2 different sources, and it just turned out that they both called them "wee". This elephant came from the book "Last minute Patchwork + quilted gifts" by Joelle Hoverson. My sister Kelsi had made 3 of these elephants for my girls a couple of years ago and they love them. Since Abram's bedspread has cute little elephants all over it I decided I would make him one for Christmas. It will look perfect in his little crib.
I used a blue gingham fabric to coordinate with his quilt.
For the blanket I used a denim fabric and the only change I made to it was by adding the fringe around the edge.
I think the braided yarn tail is such a cute touch in this pattern.
Monday, November 2, 2009
SYTYC- check it out
In case you were not aware, I just wanted to let you know of a crafting competition. It is patterned after many reality competitions. It is called So You Think You're Crafty. They chose 10 crafty ladies and they are given a challenge every week. We get to vote on the projects we like the most, and the winning project will post a tutorial, the losing is eliminated. I was amazed that I already follow the blogs of 2 of the crafters. Dana who is very talented and amazing and Jill who too is incredible. I love these blogs because these ladies are willing to share their talents (and tutorials which I love the most). The first projects were posted today. My favorites were #4 & #6. I'm pretty sure #6 is Dana's and somewhat sure #4 is Jill's. Check it out here. I'm excited about all this inspiration for the holidays. Oh how I wish there were more hours in a day.
Monday, October 26, 2009
Little Dino
Last year after Halloween, I had picked up this cute Mickey Mouse costume at the Disney Store on clearance in a size 9-12 months. I was proud of myself for thinking ahead and thought it would be great for my little Abe. As Halloween was approaching Dan and I got to talking and we both agreed that the Mickey Mouse costume was just not fitting for the little guy. It shouldn't really matter, but nonetheless I decided a dinosaur costume would be more appropriate for him. The pattern I used was Simplicity Costumes for kids 0607. Here is the end result, just in time for Halloween.
The fabric is some old vintage upholstery fabric that my mom had picked up for me. I could not have found fabric that could have been more appropriate for this costume. The only issues I had with this fabric was that it was very thick and not the easiest to sew. The hardest areas were the hat and tail where the fins were added. I actually broke 3 denim needles!
Here is a shot of the hat. Not his favorite to wear, but he does leave it on.
The little guy in action. When I'm carrying him in the costume it kind of feels like I'm packing a small rug. It's pretty hilarious, but I have to say the fabric was heavy duty enough that I'm pretty sure he won't need a coat on Halloween.
Here is the tail. We'll have to see how this works with the stroller :0.
The little guy in action. When I'm carrying him in the costume it kind of feels like I'm packing a small rug. It's pretty hilarious, but I have to say the fabric was heavy duty enough that I'm pretty sure he won't need a coat on Halloween.
Wednesday, October 21, 2009
Oven Mitt
My friend Brooke's birthday was approaching and what else would I make for such an amazing cook. I have made this mitt once before, but this one was my favorite. At least one of the fabrics is Amy Butler but I'm not sure about the others. I just love all of Amy Butlers materials. They are all so colorful and have the most beautiful print. I got this idea and pattern from Denyse Schmidt "Quilts". It is a fabulous book which I highly recommend. This is the first project I've made since last year which is painful to say since I LOVE to sew so much! Hopefully I will have more to post soon.
Monday, October 19, 2009
Wee Bunny
I've now made four of these cute little bunnies. This last one was for my little niece that just turned 2! It is an easy pattern and my girls just love it. I found the pattern as a free download here. The only addition that I made was to put a name on the front of the bunny. Now, I wish I had a machine that embroiders but I don't, so I just printed the name on regular paper in reverse (the size and font I liked) and pinned it to the back of the fabric. I then used my open toe applique foot and a small zigzag stitch to sew the name. I also made a small circle bean bag (or rice bag) that I placed in the bottom of the bunny so it will sit up better. The ears do end up being flimsy. I've tried adding interfacing, but didn't find that it helps that much. Next time on the ears I will try fusible fleece. We'll see.....
Monday, October 12, 2009
ABC's
and thought it was a great way to use up my microsuede swatch book we picked up at the furniture store closeout. The letters are so soft and the batting in between makes them a little poofy. The edges are finished like a rag quilt, clip the unfinished edges and they fray after you wash/dry. Let me tell you...a lot of tracing, cutting, clipping, etc! But it was a fun project. It took me about 4-5 hours total throughout the week. (You can probably see that the microsuede on the front didn't fray, but the little clipped fringe adds a cute look).
Sunday, October 11, 2009
Halloween pillowcases
I wanted to make my kids something quick and easy for Halloween- end result pillowcases. I got the fabric around Thanksgiving last year at Joann fabrics (planning ahead I guess) . The fabric is all Debbie mum, and I believe I got it something like 80% off? Anyway it was a steal and that's why I stored it for a whole year :). I found an excellent tutorial here. I think they took me a total of 2 hrs total and I'm typically very slow.
Tuesday, October 6, 2009
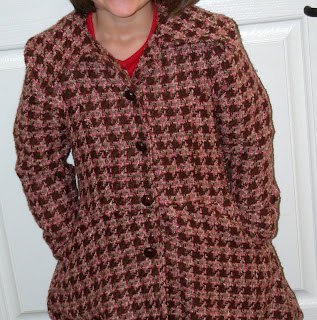
Girl's dress coat
So a few weeks ago after I got my serger back from the repair center I was itching to do some sewing/serging, so I picked this project.
I used Burda pattern number 9596 and this was coat B. Since this was my first coat attempt I was nervous to use fabric that was pricey, so I picked this fabric up at a garage sale for $1. I really thought it was super cute, but it was not easy to work with. It frayed very easily, was difficult to line up the nap, and it had some to stretch to it. I'm not even sure what this material is called! However I did think the end result turned out nice.
I lined the coat with a pink flannel that I had picked up at Joann fabrics for $1.50 yd, and it took 1 5/8 yd of this fabric. I thought it would give the coat a little extra warmth, and I bought the "made by" tag from Joann's. I thought it was a nice touch.
I really wanted to do pink buttons, however I was unable to locate any that would work for this coat. My mom found these buttons in her stash, and I liked the way they looked. After working on this fabric I opted to not sew buttonholes- I kind of thought they'd look a mess, so the buttons are ornamental and I used large snaps to keep the coat closed.
Here is the fit on Miss Savvy. She is so excited about it and loved that it had pockets. I liked that it cost me less than $5. Coming soon...... a coordinating scarf.
Thursday, October 1, 2009
the frames
Wednesday, September 23, 2009
Lamp Makeover
I have several projects in the works, but never seem to finish one before I start another! So here's one I actually finished today and I love how it turned out. We have 2 lamps we bought at Ikea a couple years ago and they simply needed a face lift.
So I googled "Ikea Lamp Makeover" which lead me to this project at www.apartmenttherapy.com
I actually do like how her lamp is round, but I figured my square lamp would work. So with a roll of parchment paper for $3.79, I headed to town. I think I used about half the roll for one lamp, and I'm planning on redoing the second one too for 2 completely new bedside lamps!
As you can see in the two pictures below, some of the sides turned out more uniform than others, but I like the variation and the flirty, ruffly look! Cute! I'm really into the ruffles craze these days.
One thing I would do differently next time (isn't this always the case?) is to cover the lamp shade completely with a flat layer of parchment paper all the way around the shade before adding the petals. This would disguise any chance of peeking through the petals. And although this one lamp took at least 3 hours, it was worth saving the money on a new lamp! I did a little each night as I watched Fox News :) Now if anyone has ideas how to refinish the base, I'm open! I could simply spraypaint, but any other creative thoughts?
Burp cloths
My sister in-law (Leisel) made me some of these burp cloths when I had Abram. I thought they were great and have duplicated them several times for baby gifts.
They are very easy to make. I chose coordinating flannel fabric for the outside and used a white fleece for the inside (this makes them a little heavier and more absorbent). I then sewed the flannel wrong sides together with the fleece sandwiched in the middle with a 5/8 in. seam around the outside.
Then just make snips all around the outside and your finished!
Subscribe to:
Posts (Atom)